|
|
|
Who's Online
There currently are 6043 guests online. |
|
Categories
|
|
Information
|
|
Featured Product
|
|
|
 |
|
|
There are currently no product reviews.
 ;
A good and useful manual. With these, We was abled to isolate and pin point the component that was causing the problem. The total time spent in troubleshooting is very much reduced.
 ;
The quality of the manual is top. The transfer worked perfect and fast.
No problems at all. Recommendable
;
Very good service for get any documentation. Fast and perfect quality.
;
Excellent service manual with all the necessary info. :)
;
The product dowload was delivered efficiently with emails to support its download availabilty. The contets of the manual was very eligible and of good quality. Will purchase from this site again!
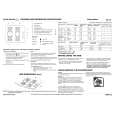
3-17. S LOAD GEAR, T LOAD GEAR, S LOAD LEVER ASSEMBLY AND T LOAD LEVER ASSEMBLY (See Figs. 3-17-1. 3-17-2 and 3-17-3)
1) Refer to section 3-16 and remove the crescent slide. 2) Refer to section 3-14-2 and remove the S and T incline mounting assemblies. 3) Remove the clamp 1, then remove the components: the S load gear 2, the S load spring 3 and the S load lever assembly 4. When you do this, be careful not to damage the clamp 1, which can be damaged easily. Again, be careful when you disassemble the components, as the S load spring 3 will spring out. 4) Remove the following components: the T load gear 5, the T load spring 6, and the T load lever assembly 7. Be careful when you disassemble the components, as the T load spring 6 will spring out.
(T side)
Apply grease here
Apply grease inside the hole (S side) Apply grease to the gears Apply grease here
Apply grease here
ASSEMBLY NOTES:
1. Apply grease (SGL-505) to the shafts 8, 9 and parts A shown in Fig. 3-17-1. Then apply grease (SGL-505) to the parts shown in Fig. 3-17-2. 2. When fitting the S load gear 2 and the T load gear 5 align them in the tape-loaded state, as shown in Fig. A in Fig. 3-17-3. Again, after completing tape-unloading on these gears, check that they are positioned as shown in Fig. B in Fig. 3-17-3, then refer to section 3-14-2 and fit the S and T incline mounting assemblies.
Apply grease inside the hole Apply grease here
Fig. 3-17-2
Fig. A: When tape loading is complete
7 T load lever assembly 6 T load spring
T load gear
S load gear
3 S load spring 4 S load lever assembly 1 Clamp 2 S load gear
5 T load gear
Fig. B: When tape unloading is complete T load gear S load gear
8 Shaft 9 Shaft Parts A (apply grease here)
Fig. 3-17-1
Fig. 3-17-3
5-23
|
|
|
> |
|