|
|
|
Who's Online
There currently are 6008 guests online. |
|
Categories
|
|
Information
|
|
Featured Product
|
|
|
 |
|
|
There are currently no product reviews.
 ;
Actually, I was looking for this information for 3 years!...now thanks to you, the manual is on my hands and of great help, cause I understand now where I was doing wrong connections and wires...excellent, I'll be back to you if in need, thank you.
 ;
This manual covers the main equipment features only. While it also includes the procedure for saving and loading from the now long obsolete memory cards it does not mention the how to operate with the optional floppy drive interface so I am still at a loss about how to use this! Note that there is a separate manual covering the MIDI interface and programming via the keyboard, not included in this download. You will also need to get hold of this if you want to use the MIDI interface properly. Basically there is little difference between this manual and the free to download manual for the similar PR60 model.
;
Good list of manuals. I found a very rare one and easily get. Should be promptly to download, as we must to wait hours even after confirmed payment.
;
The manual was properly scanned and perfectly readable. The only small problem is that I couldn't use my dear Ctrl + F to find a word I needed.
;
Nothing wrong with the manual or the delivery - came to me the same day I ordered it. But afterwards I realized that I ordered the wrong manual. Probably better with the Quick start - version. So maybe it would be better if we could see a list with inhold for each manual before ordering?
Installing the protective screen
Notes
� Installing the protective screen requires two people. Do not attempt to install the screen alone. Two people are also required to remove the protective screen. � Wear gloves to avoid leaving fingerprints on the inside of the screen.
Installation de l�écran de protection
Remarques
� L�installation de l�écran de protection nécessaire l�intervention de deux personnes. Aussi, ne tentez pas d�installer seul l�écran. Deux personnes sont également nécessaires pour retirer l�écran de protection. � Portez des gants de manière à ne pas laisser de traces de doigts sur la face intérieure de l�écran.
Instalación de la pantalla protectora
Notas
� Son necesarias dos personas para instalar la pantalla protectora. No la instale solo. Igualmente, son necesarias dos personas para extraer la pantalla protectora. � Póngase guantes para evitar dejar huellas dactilares en el interior de la pantalla.
¶w��´O�@´�
µË� â�¢ ¶wâ��Ã�¶Ï�´Oâ��@´Ã�ªâ�ºâ�¢â��®â��â� â��§Hâ��i ¶Ã�°Mâ�¦â��§â��â��â��Ï�Å�øW¶¤¶wâ��Ã�-®Ë�§U ´Oâ��@´Ã�§]ªâ�ºâ� n®â��â� â��§Hâ��i¶Ã�â�¢ ¶wâ��Ã�Ã�â�¦Â°Mâ�¦â��¿Ï� Ã�Mâ�¢H®æ§Ã�¶b §W§â�� ´Oâ��@´Ã�§â�«â��ºÃ�d§U§â��´¸¶L1 â�¦â��®Ë�§U´Oâ��@´Ã�®â��â� ±â�¢â�«Â´Oâ��@ â�¦Â§/
1 Remove the protection film on both surfaces of the protective screen.
1 Enlevez le film protecteur apposé sur les deux faces de l�écran de protection.
The mark Le symbole La marca
1 Retire la pelÃcula de protección de las dos superficies de la pantalla protectora.
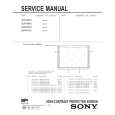
2 Left frame bar
Barre d�encadrement gauche Barra del marco izquierdo ���ÿ±¯
Upper front Avant, haut Parte frontal superior ´eâ� ±§Wâ�¥Â° Concave area at the back Partie concave à lâ��arrière Ã�rea cóncava de la parte trasera ´·â� ±â�¢Wâ�¥Â°
indicates the front (your side). indique l�avant (face à vous). indica la parte frontal (su lado).
Right frame bar Barre d�encadrement droite Barra del marco derecho �k�ÿ±¯
Upper front Avant, haut Parte frontal superior ´eâ� ±§Wâ�¥Â° Concave area at the back Partie concave à lâ��arrière Ã�rea cóncava de la parte trasera ´·â� ±â�¢Wâ�¥Â°
ºâ��â��Oâ�¢Ã�â�¢â�¹Â´eâ� ±°]â� ±¶V±zâ�¢â�«Â§@â��º°^-
Shorter at the back Plus court à lâ��arrière Más corto en la parte trasera ´·â� ±µuâ�¥Â°
Lower front Avant, bas Parte frontal inferior ´eâ� ±§Uâ�¥Â°
Shorter at the back Plus court à lâ��arrière Más corto en la parte trasera ´·â� ±µuâ�¥Â°
Align the bottoms of the frame bars with the bottom of the protective screen. Alignez le bas des barres du cadre sur le bas de l�écran de protection. Alinee las partes inferiores de las barras del marco con la base de la pantalla protectora. ±N�ÿ±¯��©��°���«´O�@´���©��°/
2 Attach the right and left 2 Fixez les barres frame bars to the d�encadrement gauche protective screen. et droite sur l�écran de protection. Be sure to attach them with Assemblez-les aux barres the upper and lower, and supérieure et inférieure en front and back sides positionnant correctement positioned correctly. les faces avant et arrière. 1 Attach the bars to the 1 Montez les barres de l�écran protective screen, aligning de protection, alignez-en le their bottoms with the bas sur le bas de l�écran de bottom of the protective protection en posant screen on a hard flat surface l�ensemble sur une surface such as a bare floor. plane et rigide, par exemple 2 Push the upper parts of the sur un sol nu. 2 Poussez fermement les bars firmly onto the parties supérieures des protective screen until the barres sur l�écran de screen is completely in the protection de façon à ce que channel. l�écran soit complètement maintenu dans la rainure.
2 Fije las barras de los marcos derecho e izquierdo en la pantalla protectora. FÃjelas con los lados superior e inferior, y frontal y posterior colocados correctamente. 1 Fije las barras a la pantalla protectora, alineando sus partes inferiores con la parte inferior de la pantalla protectora, sobre una superficie dura y plana, como el suelo. 2 Ejerza presión firmemente sobre las partes superiores de las barras contra la pantalla protectora hasta que la pantalla encaje por completo en el canal.
2 ±Nâ�¢â�¢Â°Nâ�¢kâ��ºÃ�ÿ±¯¶wâ��Ã�¶b´Oâ��@ ´Ã�§W/ ¶ â�� Ã� °M » â�� Å� â�° W UNe w Ã� â�¦ â��â�¦Â® ® § § ° ´ ´·â��ºÃ�°â�¥B©Ã�â�¢Ã¸â�¦T¶Ã�â��m1 ±NÃ�ÿ±¯¶wâ��Ã�¶â�¹Â´Oâ��@´Ã�Ã�â�¦Â°Mâ�¦â�� ±N®â�°Â©â�¥â�¥Â°ÂªP©Ã�¶bâ�¢Ë�¶aâ�¢O§Ã�â��Ë� â��Ã�µwâ�¢â� â� ±§Wâ�¢â�«Â´Oâ��@´Ã�â�¢â�«Â©â�¥â�¥Â° Ï�Ã�ªÃ�2 ±NÃ�ÿ±¯â�¢â�«Â§Wâ�¥Â°Â±Â¿â�� ¶â�¹Â´Oâ��@´Ã� ®Å�®â�°â��â� ©T°Mâ�¢â�¦Â¶â�¹Â´Ã�Ï�ıÃ�Ï�â�¢Ë�¥° §Jºâ��§â�«-
|
|
|
> |
|