|
|
|
Who's Online
There currently are 5766 guests and
2 members online. |
|
Categories
|
|
Information
|
|
Featured Product
|
|
|
 |
|
|
There are currently no product reviews.
 ;
It took about 24-hours after my payment before I was able to get to the download. Apparently, payment processing is not 100% automated. That is no big deal, just be aware of that going in.
After I got to it, it was in good shape, easy to read, etc. Not some cheap FAX copy looking thing.
Also, this site was the cheapest I found. Another Plus!
 ;
Good price, very legible manual, exactly what I needed -- but had to wait a day to actually get the download of the manual. Would have preferred to download it immediately after payment rather than waiting for someone to "process" my order. I was surprised that I had to wait that long.
;
As the only source for this manual it rather rank quite high since it is well scanned and perfectly readable.
;
the manual is in good quality and it's in pdf. manual was send in less then 24h.
regards
mike
;
I would not plug this machine in without finding a manual like this. In addition to setup and normal operating instructions, it has troubleshooting flowcharts, diagrammed mechanical adjustments, and schematics to beat the band. The tech I hand it to would be thrilled to find solder side PCB diagrams with component outlines superimposed, pinouts for every IC chip, and line drawings of transistors, with labeled legs.
As for printing quality, this may be a copy of a copy, but even the finest print when enlarged is very legible. There is a bit of grayed print over a few pages, as if a wet page were placed over it, but the print is still very legible. If you could borrow an original manual and get it printed and bound for 4 to 6 times the cost, you could get better quality. In that case you wouldn't be here. For price, utility, and availability I am rating this manual highly.
This section is extracted from instruction manual.
GENERAL
Features
With this remote commander, you can control your car audio equipment easily. Use this remote commander with master units equipped with the special input jack for the rotary commander and the Sony Bus system control.
Installation
Notes � Choose the mounting location carefully so that the remote commander: � will not interfere with driving the motorboat. � can easy of operate the remote commander and the display is to see. � will not get wet or dirty from sea water, rain, dust, etc. � is not subject to high temperatures, such as from direct sunlight. � Be sure to use only the supplied mounting hardware for a safe and secure installation. � When installing the remote commander, be sure not to damage the electrical cables etc., on the other side of the mounting surface.
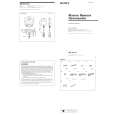
Location and function of controls
1
Make the mounting holes as follows.
¿ 24.5 (31/32) ¿ 8.5 (11/32)
54 (2 1/4)
Unit: mm (in.) The following buttons (except the SOURCE and MODE button) share the same functions as those on the master unit or the wireless remote commander. For more information about the functions of each button or control, refer to the operating instructions of your Sony car audio equipment.
2
45 3 1 or 2 9
1 VOL (volume) + � button 2 ATT (attenuate) button Press to attenuate the sound momentarily. 3 SOURCE button Press to select program sources. 4 SEEK/AMS button During tape or CD/MD playback: �AMS* function: Locates the beginning of tracks. Each time you press either side of the button a track is skipped. To skip several tracks at once, press either side of the button momentarily and release. Within one second, press it again and hold it.
* Automatic Music Sensor.
Connection
�Manual search: Locates the desired part of a track. Press and hold either side of the button until the desired part is located. When the desired track is reached, release. During radio/TV reception: �Automatic tuning: Automatically tunes in to a station. When a station is tuned in, the search stops automatically. Press either side of the button momentarily several times until a desired station is tuned in. �Manually searches for a station. Press either side of the button until the desired station is tuned in. If you press again within one second, you can continue manually search for another station. 5 MODE button �Changes the playback side of the cassette. �Selects CD units when several CD units are connected. For example: CD1 t CD2 t ··· �Selects MD units when several MD units are connected. For example: MD1 t MD2 t ··· �Changes the preset groups. For example: FM1 t FM2 t AM t ··· �Changes the TV/AUX (video) mode. 6 OFF button Press to turn off the unit. 7 DISC/PRST button �Fast-winds the tape. To resume normal playback, press the MODE button. �Changes the disc when one or more CD/MD units are connected. �Receives the stations memorized on the preset number buttons on the master unit.
CD/MD changer
6
7
8 ATT (attenuate) indicator When the ATT function is on, the ATT indicator blinks. 9 Source information 0 Mode information
Not supplied (supplied with CD/MD changer)
Source Tuner Tape
Source information (9) FM1, FM2, AM TAPE
Mode information (0) Frequency � FWD (Forward) � REV (Reverse) � FF (Fast-forward) � REW (rewind) Disc number (with the CD/MD units) and Track number Channel number ���� Volume level
CHANGER
COMMANDER/ DISPLAY
8
MASTER UNIT
Master unit with Sony BUS system
Notes � Be sure all the cords, connection plugs, and the divide box are located and fixed in position so that they are not subjected to high temperatures, vibration, sea water, rain, dust, etc. � When finished making all the connections, press the RESET button of the master unit. � When you connect the remote commander to the master unit and other units (CD/MD changer etc.), refer also to the Installation/Connections manual of the master unit and other units. � You cannot connect more than two CD/MD changers.
CD/MD TV Video Volume
CD, MD TV AUX VOL
Master unit
0
After connecting, bundle up the connecting cords of the remote commander with other connecting cords of the audio equipment by attaching the supplied clamp 0. Be sure to leave some slack in the connecting cord between the plug and the clamp as illustrated.
2
 $4.99 RMXM10 SONY
Owner's Manual Complete owner's manual in digital format. The manual will be available for download as PDF file aft…
|
|
|
> |
|