|
|
|
Who's Online
There currently are 5510 guests online. |
|
Categories
|
|
Information
|
|
Featured Product
|
|
|
 |
|
|
There are currently no product reviews.
 ;
El producto satisface las necesidades del servicio t
;
This is a good quality scan of the Operation & Maintenance (Service) Manual for the PAL version of this high-band broadcast umatic, BVU-800P
All schematics and lineup procedures appear to be included in this one manual AFAICT.
The file size is just over 113 MB which gives an idea of the quality and number of pages.
All of the schematics, which contain some fairly small print, are easily readable when you zoom into the page.
John Thompson, Newcastle Upon Tyne, England.
;
Good quality, all schematics of few of models. There is also short form of user manual and regulation manual.
;
Perfect copy of the service manual. you can enlarge every page, and it comes up
with all details.
;
It´s very very nice manual with all, what i need. Original in good quality. Very fast business. Very much thanks...
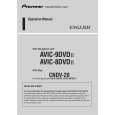
To enter a letter with an accent mark, select an accent followed by the letter. Example: Select � ` � and then �a� to enter �à .� To insert a space, select �Space.�
Recording mode
Recording time (hour) HDD DVD 1 1.5
Recording
Before Recording
Before you start recording�
� This recorder can record on various discs. Select the disc type according to your needs (page 8). � Check that the disc has enough available space for the recording (page 39). For HDD,
HQ (High quality) HSP R
33
3
Repeat steps 1 and 2 to enter the remaining characters.
Input row
Input Title Name
Kids
51
SP (Standard mode) LP EP r r
67 103 137 204
2 3 4 6
SLP (Long duration)
1
.
,
-
1 2 3 4 5 Back
6MNO6 7PQRS 8 Z 9 7
"A" "a" Symbol
DVD+RWs, and DVD-RWs, you can free up disc space by erasing titles (page 67). � Adjust the recording picture quality and picture size if necessary (page 51).
z Hint Timer recordings will be made regardless whether or not the recorder is turned on. You can turn off the recorder without affecting the recording even after recording starts.
�HQ+� recording mode
�HQ+� records pictures in higher quality than HQ on the HDD. Set �HQ Setting� in Features Setup to �HQ+� (page 93). Maximum recording time is 21 hours. �HQ� appears in the display.
2ABC 3DE 4GH 5J K F I L
Clear All 8 T U V Space 9WXY 0 0
Cancel Finish
To erase a character, move the cursor to the right of the character at the input row. Select �Back� and press ENTER. To insert a character, move the cursor to the right of the point where you want to insert the character. Select the character and press ENTER. To erase all of the characters, select �Clear All� and press ENTER.
Note
Situations below may cause slight inaccuracies with the recording time. � Recording a program with poor reception, or a program or video source of low picture quality � Recording on a disc that has already been edited � Recording only a still picture or just sound
Recording mode
Like the SP or LP recording mode of VCRs, this recorder has six different recording modes. Select a recording mode according to the time and picture quality you need. For example, if picture quality is your top priority, select the High Quality mode (HQ). If recording time is your priority, Super Long Play mode (SLP) can be a possible choice. Note that recording times in the following table are approximate and the actual times may differ. Note also that the maximum continuous recording time for a single title is eight hours (HDD), or six hours (DVD). Contents beyond this time will not be recorded. Press REC MODE repeatedly to switch the recording modes.
I want to record with the best possible picture quality, so I�ll select HQ.
Recording a stereo/SAP program
The recorder can receive and record stereo/SAP programs.
4
Select �Finish,� and press ENTER.
To cancel the setting, select �Cancel.�
Stereo programs
When a stereo program is received, the �STEREO� indicator lights up on the front panel display. If there is noise in the stereo program, set �Auto Stereo� in Audio Setup to �Off� (page 89). The sound will be recorded in monaural but with less noise.
To use the number buttons
You can also use the number buttons to enter characters.
1
In step 2 above, press the number buttons repeatedly to select a character. Example: Press the number 3 button once to enter �D.� Press the number 3 button three times to enter �F.� Press SET and select the next character. Select �Finish� and press ENTER.
SAP (Second Audio Program)
When a SAP (Second Audio Program) is received, the �SAP� indicator lights up on the front panel display. To record only SAP sound, set �Tuner Audio� in Audio Setup to �SAP� (page 89).
2 3
44
,continued
45
Unrecordable pictures
Pictures with copy protection cannot be recorded on this recorder. When the recorder receives a copy guard signal, the recorder continues to record but only a blank, gray colored screen will be recorded.
Copy control signals Copy-Free Recordable discs
Timer Recording (TV GUIDE/ Manual/VCR Plus+) 2
There are three methods to set the timer � setting the timer using the TV Guide On Screen system, using VCR Plus+ and setting the timer manually.
Wait until �LOAD� disappears from the front panel display. Unused DVDs are formatted automatically.
To adjust the recording quality
Timer Settings�(page 49).
See step 3 of �Checking/Changing/Canceling
Press [TV GUIDE].
8:05
TODAY SCHEDULE
8:00PM
LISTINGS
8:30PM
SORT
Rec Mode Adjust
Doctors and Lawyers Local News Today's News The Urban Garden
Sports
Notes
HDD
-RWVideo +RW +R -RWVR -R
Copy-Once Copy-Never
HDD
-RWVR (Ver.1.1 with CPRM*)
� When the recorder is connected to a cable box and you want to record using the TV Guide On Screen system, do the following: Turn on the cable box, connect the set top box controller, and set �Set Top Box Control� in the Settings setup to �On.� � Do not operate your cable box or satellite receiver just before or during a timer recording. This may prevent the accurate recording of a program.
Promotional Panel
Music Show
Local News
If there is not enough available disc space for the recording, the recorder automatically adjusts the recording mode to enable the entire program to be recorded. Set �Rec Mode Adjust� in Features Setup to �On� (page 93).
Chemicals and Chemistry World Soccer
Auto Title Erase (HDD only)
INFO.
Promotional Panel
8:00
10:00
FAVORITES
RECORD
High Places The Law and You
If there is not enough space for a timer recording, the recorder automatically erases old titles recorded on the HDD. Set �Auto Title Erase� in Features Setup to �On� (page 93). The oldest, played title is erased. The protected titles are not erased.
Recording
None (a blank screen is recorded)
3
Press </M/m/, to select a program.
To search for a program alphabetically or by category, select �SORT� in the Main Menu Bar. See �Using the TV Guide On Screen system� for more information about navigating the TV Guide On Screen system (page 33).
* The recorded disc can be played only on CPRM compatible equipment.
Recording using the TV Guide On Screen system (TV GUIDE)
You can use the TV Guide On Screen system to set the timer to record a program up to eight days in advance.
Z OPEN/ CLOSE HDD
1 4 7 2 5 8 0 3 6 9
If the timer settings overlap
If one or more timer settings overlap, appears next to the program and the recording is suspended. The timer recording resumes its original status when the overlap condition no longer exists. To change the timer settings, see �Checking/Changing/Canceling Timer Settings� (page 49).
Note
Copy-Once programs can not be dubbed (page 73).
4
DVD
Press the green button.
appears next to the program. Each time you press the blue button, the timer recording changes as follows. : the program is recorded once. : the program is recorded on a regular basis. : the program is recorded weekly. : the timer recording is temporarily put on hold without canceling the setting.
Notes
� Check to see that there is enough available space for the recording (DVD+RW/DVD-RW only) (page 67). Note that recordings made with the TV Guide On Screen system require one extra minute of recording time. � The Rec Mode Adjust function only works with a timer recording. It does not function with Quick Timer (page 51). � You cannot adjust the recording quality or recording destination once the recording starts.
Blue button
[TV GUIDE]
Green button </M/m/,, ENTER
5
Press [TV GUIDE].
The TIMER REC indicator lights up on the front panel display and the recorder is ready to start recording. When recording from a cable box, be sure to turn it on. Unlike a VCR, there is no need to turn off the recorder before the timer recording starts.
x REC STOP
1
Press HDD or DVD.
If you select DVD, press Z OPEN/CLOSE and place a DVD on the disc tray. Press Z again to close the disc tray.
To confirm, change, or cancel a timer recording
See �Checking/Changing/Canceling Timer Settings� (page 49).
To stop recording during timer recording
Open the remote�s cover and press x REC STOP. Note that it may take a few seconds for the recorder to stop recording.
With the recording side facing down
46
,continued
47
1-11
|
|
|
> |
|