Manuals were delivered promptly and were correct as advertised. No issues with the download link which was provided promptly after everything was processed. Very pleasant experience
Wonderful service... doubt that I could have made the repairs to my turntable without this service manual. Great help!
Well worth the price paid!
Text excerpt from page 13 (click to view)
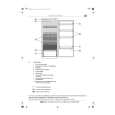
1-4.Replacing the CPU
1. Removing the CPU
1
2
1 Insert a screwdriver tip into the groove as shown and slant it in the direction of the arrow. NOTE: Do not use screwdrivers having a large tip than the width of the groove. Otherwise, it may cause the groove to be damaged. The base under the CPU moves slightly in the direction of the arrow and the lock is released.
2 The CPU can be removed upward.
2. Installing the CPU
Attach the CPU while aligning the cut-out with this position.
2
1
1 Insert all pins of the replacement CPU into the holes of the base and push the CPU in the direction of the arrow.
2 Insert a screwdriver tip into the groove as shown and slant it in the direction of the arrow. The base under the CPU moves slightly in the direction of the arrow and the CPU is locked.