|
|
|
Who's Online
There currently are 5914 guests online. |
|
Categories
|
|
Information
|
|
Featured Product
|
|
|
 |
|
|
There are currently no product reviews.
 ;
Quality scan of the original. All the detail necessary to troubleshoot, repair and adjust the unit. I'm sure I will be downloading more manuals in the future as the need arises.
;
Exactly as described, a Service Manual complete with the schematics and PCB layout delivered in a timely manner. Many thanks for the great service.
 ;
some of the writing is a bit blur but the part in the schmatic was great and i have fixed the machine thanks
;
Well.. I'd searched for this manual and although I found many copies online I was pleased to find your website with a well balanced pricing system and easy to search and follow links. That together with the very quick response time was just what I was looking for.. being a very impatient tech.. ;-) I had the service manual in front of me within a short time.
Bookmarked.. and you can bet I will always come here first for my service & user manuals..
best regards
Ed(Tony) Foley
G7WHK
;
I will definitely be back for more information when I need it.
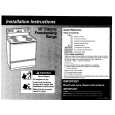
Setting the date and time
When you first use your camera, set the date and time. If these are not set, the CLOCK SET screen appears whenever you turn on your camera.
5
Set the numeric value with v/V on the control button, then press the center z to enter it. After entering the number, v/V moves to the next item. If you selected [D/M/Y] in step 3, set the time on a 24-hour cycle. Select [OK] with B on the control button, then press the center z at the desired moment to begin clock movement. The date and time are entered.
CLOCK SET 2001 / 7 / 1
OK
Y/M/D M/D/Y D/M/Y 12 : 00
AM
OK
CANCEL
1 2
POWER ON/OFF (CHG) lamp
6
CLOCK SET
Y/M/D
M/D/Y D/M/Y 10 : 30
PM
2001 / 7 / 4
OK CANCEL
3�6
OK
To cancel the date and time setting Select [CANCEL] with v/V/b/B on the control button, then press the center z.
1 2
Set the mode dial to
, S, A, M,
, SCN, or
.
Push the POWER switch in the arrow direction to turn on the power. The POWER ON/OFF (CHG) lamp (green) lights up. The CLOCK SET screen appears. When resetting the date and time once you set, set the mode dial to SET UP (page 84), and then follow the procedure from step 3. Select the desired date display format with v/V on the control button, then press the center z. Select from [Y/M/D] (year/month/day), [M/D/Y] (month/day/year), or [D/M/Y] (day/month/year).
3
CLOCK SET 2001 / 1 / 1 12 : 00
Y/M/D M/D/Y D/M/Y
AM
OK
CANCEL
OK
4
Select the year, month, day, hour or minute item you want to set with b/B on the control button. The item to be set is indicated with v/V.
CLOCK SET
Y/M/D M/D/Y D/M/Y 12 : 00
AM
2001 / 1 / 1
OK CANCEL
OK
14
15
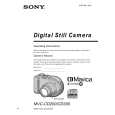
Inserting a disc
You can use only the 8 cm CD-Rs or 8 cm CD-RWs that have these marks.
Removing the disc While sliding the lock tab to the left, slide down the disc cover OPEN lever, and open the disc cover after the cover is unlocked. Then, remove the disc as illustrated below.
1
Disc cover OPEN lever Lock tab
2
Getting started Getting started
Notes
� Before removing the disc, be sure to check that the disc is not rotating. � Do not open the disc cover while the ACCESS lamp is lit. If you do, the recorded image may be damaged or the disc may become unusable. � When writing data on a disc or connecting with a computer using the USB connection, the disc cover OPEN lever is locked.
1 2
While sliding the lock tab to the left, slide down the disc cover OPEN lever. Open the disc cover by your hand after the cover is unlocked. Place a disc with the printed side up. Push down the center of the disc until it clicks. When installing, do not push with too much force and do not touch the pickup lens.
Pickup lens
Push here Disc
3
Close the disc cover.
16
17
1-3
|
|
|
> |
|