|
|
|
Who's Online
There currently are 5855 guests online. |
|
Categories
|
|
Information
|
|
Featured Product
|
|
|
 |
|
|
There are currently no product reviews.
 ;
Perfect source for service manuals: fast and professional transaction; high quality, perfect readable and largely scaleable PDF; complete schemes, diagrams and spare part list. Tnx a lot, cu again!!!!
;
I got your link from a friend and I must say that I am really satisfied with your service. Specially this B&O manual I didn't find anywhere on the web... but you could deliver it :-) . You deliver very fast and the copy is of good quality. So your webpage is bookmarked. Thanks
;
This was the Sony CCU-500A Service manual I was looking for.
The price was reasonable.
The permission to download was quck.
I will use Owner-Manual.com for all my manual needs.
;
Excellent printing quality.
A complete and very usefull service manual with all details.
GREAT SERVICE AT VERY LOW PRICE!
A+++++++++++++++++++++++++
;
Excellent printing quality.
A complete and very usefull service manual with all details.
GREAT SERVICE AT VERY LOW PRICE!
A+++++++++++++++++++++++++
4-8. Focus Bias Adjustment
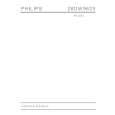
Adjusting Method : 1. Load a continuously recorded disc (Refer to �4-4. Creating MO Continuously Recorded Disc�.). 2. Rotate the SELECTOR knob and display �CPLAY MODE�. 3. Press the YES button twice and display �CPLAY MID�. 4. Press the NO button when �C1 = AD = � is displayed. 5. Rotate the SELECTOR knob and display �FBIAS ADJUST�. 6. Press the YES button and display � / a = �. The first four digits indicate the C1 error rate, the two digits after [/] indicate ADER, and the 2 digits after [a =] indicate the focus bias value. 7. Rotate the SELECTOR knob in the clockwise direction and find the focus bias value at which the C1 error rate becomes 220. 8. Press the YES button and display � / b = �. 9. Rotate the SELECTOR knob in the counterclockwise direction and find the focus bias value at which the C1 error rate becomes 220. 10. Press the YES button and display � / c = �. 11. Check that the C1 error rate is below 50 and ADER is 00. Then press the YES button. 12. If the �( )� in � ( )� is above 20, press the YES button. If below 20, press the NO button and repeat the adjustment from step 2 again. 13. Press the NO button and press the EJECT button to remove the continuously recorded disc. Note 1 : The relation between the C1 error and focus bias is as shown in the following figure. Find points a and b in the following figure using the above adjustment. The focal point position C is automatically calculated from points a and b. Note 2 : As the C1 error rate changes, perform the adjustment using the average vale.
C1 error 220
4-9. Error Rate Check
4-9-1. CD Error Rate Check Checking Method : 1. Load a test disc TDYS-1. 2. Rotate the SELECTOR knob and display �CPLAY MODE�. 3. Press the YES button twice and display �CPLAY MID�. 4. �C1 = AD = � is displayed. 5. Check that the C1 error rate is below 20. 6. Press the NO button, stop playback, press the EJECT button, and remove the test disc. 4-9-2. MO Error Rate Check Checking Method : 1. Load a continuously recorded disc (Refer to �4-4. Creating MO Continuously Recorded Disc�.). 2. Rotate the SELECTOR knob and display �CPLAY MODE�. 3. Press the YES button twice and display �CPLAY MID�. 4. �C1 = AD = � is displayed. 5. If the C1 error rate is below 50, check that ADER is 00. 6. Press the NO button, stop playback, press the EJECT button, and remove the continuously recorded disc.
4-10. Focus Bias Check
Change the focus bias and check the focus tolerance amount. Checking Method : 1. Load a continuously recorded disc (Refer to �4-4. Creating MO Continuously Recorded Disc�.). 2. Rotate the SELECTOR knob and display �CPLAY MODE�. 3. Press the YES button twice and display �CPLAY MID�. 4. Press the NO button when �C1 = AD = � is displayed. 5. Rotate the SELECTOR knob and display �FBIAS CHECK�. 6. Press the YES button and display � / c = �. The first four digits indicate the C1 error rate, the two digits after [/] indicate ADER, and the 2 digits after [c =] indicate the focus bias value. Check that the C1 error is below 50 and ADER is 00. 7. Press the YES button and display � / b = �. Check that the C1 error is not below 220 and ADER is not above 00 every time. 8. Press the YES button and display � / a = �. Check that the C1 error is not below 220 and ADER is not above 00 every time. 9. Press the NO button, next press the EJECT button, and remove the continuously recorded disc. Note 1 : If the C1 error and ADER are above 00 at points a or b, the focus bias adjustment may not have been carried out properly. Adjust perform the beginning again.
Focus bias value (F. BIAS) b c a
� 17 �
|
|
|
> |
|