|
|
|
Who's Online
There currently are 5872 guests and
4 members online. |
|
Categories
|
|
Information
|
|
Featured Product
|
|
|
 |
|
|
There are currently no product reviews.
 ;
available for me the service manual is in order!
thanks
 ;
This is exactly the thing you need to service this box. The manual is complete and the quality of the scan is good. I recommend this!
;
The delivery of this manual was very fast, less than 8 hours. The manual is very clear and concise, and helped a great deal in the repair and final setup of the Hitachi HMA-G2 Amplifier.
;
Great service. The manual was exactly what I was looking for: schematic + layout. I managed to fix the player. Highly recommended!
;
At $5,00 certainly good bang for your buck. Includes electric schematics as well as exploded parts view + parts list for reordering. Unfortunately no details on the PCB contents or working, but then again, this is not overly complex. Best bonus: this manual does contain the heavily searched for LED error codes as well as descriptions for test operation. Haven't gotten around to fixing the machine yet, one thing the manual won't do for you is getting it out of the kitchen assembly :-(
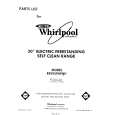
KV-PG21P40/PG21M70/PG21P70
2-7. PICTURE TUBE REMOVAL Note:
� Please make sure the TV set is not in standing position before removing necessary CRT support located on bottom right and left.
� REMOVAL OF ANODE-CAP
NOTE : After removing the anode, short circuit the anode of the picture tube and the anode cap to the metal chassis, CRT shield or carbon paint on the CRT.
!� Cushion (50x550) DGC 8 Demagnetic coil !¡ Holder DGC
� REMOVING PROCEDURES
RM-952
!£ Cushion (35x250) DGC
a a 1 Turn up one side of the rubber cap in the direction indicated by the arrow a.
7 Chassis assy 4 Four screws (washer head) (BVTP 3 � 12) 2 CV board 5 Deflection yoke 3 Speaker (5 � 9cm) !º Two screws (Tapping 5+ Crown Washer) 6 Tension spring 9 Two screws (Tapping 5 + Crown Washer)
A Board
b b
12 �
Coating earth assy CRT Support Block !� Picture tube
2 Using a thumb pull up the rubber cap firmly in the direction indicated by the arrow b.
c
1 Anode cap
Anode button
3 When one side of the rubber cap is separated from the anode button, the anode-cap can be removed by turning up the rubber cap and pulling it up in the direction of the
Screw Location
arrow c.
�
HOW TO HANDLE AN ANODE-CAP
CRT Support Block
1 Do not damage the surface of anode-caps with sharp shaped objects. 2 Do not press the rubber too hard so as not to damage the inside of anode-cap. A metal fitting called the shatter-hook terminal is built into the rubber. 3 Do not turn the foot of rubber over too hard. The shatter-hook terminal will stick out or damage the rubber.
Slim Beznet !¢ Cushion
|
|
|
> |
|