|
|
|
Who's Online
There currently are 6043 guests online. |
|
Categories
|
|
Information
|
|
Featured Product
|
|
|
 |
|
|
There are currently no product reviews.
 ;
The service was quick and simple, finding the service manual easy and it appears to be the original with colour schematics. It contained the info I was after and so sorted the problem.
I have copied it to CD and attached the envelope to the inside back cover of the owners manual. Good manual and excelent service. Robin Wood, Wood Electronics, New Zealand.
;
Exactly what was needed to assess the product - excellent value and great service
 ;
Nice to have the service manual for the Sony DCR-TRV345E now. The document is of excellent quality.
;
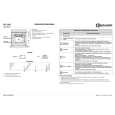
MACKIE HR824 26 pages English-only Service Manual contains:
1) HR824 technical overview with the description of front and rear panel switches.
2) HR824 specs
3) Block Diagram
4) Wiring Diagram
5) Packaging management
6) Spare part & final assembly list (for PCB rev A and B) + exploded view
7) Test Procedures (where, how to measure voltage...) including Test Point diagram on the PCB.
8) IC and Transistor charts.
Excellent guide: very clear, good scan quality enabling us to print readable diagram :-)
Note:
Mackie HR824 make extensive use of surface mount devices (SMD). Service on the HR824 must
only be undertaken by experienced service technicians with the right tools, experience and patience to perform surface mount rework when needed.
;
This Service manual is very well scanned and its clean to read, no any anti-theft words that un-english could understand. I got my CCD600 working with this manual and it´s clear shematics :)
6-4.
DRIVE AUTO ADJUSTMENT
1.
DVD-SL (single layer) Select [1], insert DVD single layer disc, and press [ENTER] key,
and the adjustment will be made through the following steps, then adjusted values will be written to the EEPROM. DVD Single Layer Disc Adjustment Steps 1. SLED TILT Reset 2. Disc Check Memory SL 3. Wait 300 msec 4. Set Disc Type SL 5. 6. 7. 8. 9. 10. 11. 12. 13. 14. 15. LD ON Spdl Start Wait 1 sec Focus Servo ON 0 Auto Track Offset Adjust CLVA ON Wait 500 msec Tracking ON Wait 1 sec Sled ON Check CLV Lock
On the Test Mode Menu screen, press [1] key on the remote commander, and the drive auto adjustment menu will be displayed.
## Drive Auto Adjustment ## Adjustment Menu 0. 1. 2. 3. ALL DVD-SL CD DVD-DL
4. SACD
Exit: RETURN
Normally, [0] is selected to adjust DVD (single layer), CD, DVD (dual layer), and SACD in this order. But, individual items can be adjusted for the case where adjustment is suspended due to an error. In this mode, the adjustment can be made easily through the operation following the message displayed on the screen. The disc used for adjustment must be the one specified for adjustment. However, for SACD disc, use the player with initial data if the disc is not available.
16. Auto LFO Adjust 17. Auto Focus Offset Adjust 18. Auto Tilt Position Adjust 19. Auto Focus Gain Adjust 20. Auto Focus Offset Adjust 21. EQ Boost Adjust 22. Auto LFO Adjust 23. Auto Track Gain Adjust Search Check 24. 32Tj Fwd 25. 32Tj Rev 26. 500Tj Fwd 27. 500Tj Rev 28. All Servo Stop 29. Eep Copy Loop Filter Offset
ALL Select [0], insert each disc (1. DVD-SL, 2. CD, 3. DVD-SL, 4. SACD) to table from No.1 to No. 4 and press [ENTER] key, and
the servo set data in EEPROM will be initialized. Then, 1. DVDSL disc, 2. CD disc, 3. DVD-DL disc, and 4. SACD disc are adjusted in this order. Though the message to confirm whether discs other than SACD disc are adjusted is not displayed, you can finish the adjustment if pressing the [STOP] button. During adjustment of each disc, the measurement for disc type judgment is made. As automatic adjustment does not judge the disc type unlike conventional models, take care not to insert wrong type discs. Also, do not give a shock during adjustment.
0.
6-5
|
|
|
> |
|