|
|
|
Who's Online
There currently are 5952 guests online. |
|
Categories
|
|
Information
|
|
Featured Product
|
|
|
 |
|
|
There are currently no product reviews.
 ;
Turns out this was not the manual i was looking for. The concertmate 670 keyboard i have is a "Realistic" model made for Radio Shack and none of the diagrams on the owners manual i received matches up. HOWEVER, I must say the service Owners Manual provides was fast and efficient by being available online. The manual was in good readable condition and easily downloaded.
 ;
Great price, Quick delivery, the document was very usefull A+++++++++++++++
;
Thank´s for your help, I already recived these manual from you
;
Thank you for your manual It has the basic things to and i use the Oszi for Longer Time.
THX
;
Actually, I was looking for this information for 3 years!...now thanks to you, the manual is on my hands and of great help, cause I understand now where I was doing wrong connections and wires...excellent, I'll be back to you if in need, thank you.
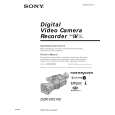
Step 1 Preparing the power supply Charging the battery pack
Use the battery pack after charging it. Your camcorder operates only with the �InfoLITHIUM� battery pack (L series).
(1) Open the DC IN jack cover and connect the AC Adaptor supplied with your camcorder to the DC IN jack with the plug�s v mark facing toward the LCD panel side. (2) Connect the power cord to the AC Adaptor. (3) Connect the power cord to a wall outlet. (4) Set the POWER switch to OFF (CHG). Charging begins.
The remaining battery time is indicated in minutes on the display window. When the remaining battery indicator changes to u, normal charge is completed. To fully charge the battery (full charge), leave the battery pack attached for about one hour after normal charge is completed until FULL appears on the display window. Fully charging the battery allows you to use the battery longer than usual.
4
VCR OFF CAMERA
POWER
1
(CHG) MEMORY
After charging the battery pack Disconnect the AC Adaptor from the DC IN jack on your camcorder. Note on the remaining battery time indicator The remaining battery time indicator on the LCD screen/display window or in the viewfinder indicates the recording time using the viewfinder. The indicator may not be correct, depending on the conditions in which you are recording. When you close the LCD panel and open it again, it takes about one minute for the correct remaining battery time to be displayed. Notes �Prevent metallic objects from coming into contact with the metal parts of the DC plug of the AC Adaptor. This may cause a short-circuit, damaging the AC Adaptor. �Keep the battery pack dry. �When the battery pack is not to be used for a long time, charge the battery pack once fully, and then use it until it fully discharges again. Keep the battery pack in a cool place.
10
|
|
|
> |
|