Complete service manual in very good scanning quality with all schematic and PWB graphics as well as assembly & maintenance instructions. A slight drawback is that the rastering of the PWB graphics sometimes makes it a bit difficult to follow fine traces, but no showstopper.
Purchased the manual that I was looking for at a great price and could download it easily.. Great service experience and for future purchases I plan to use the site. Thank you very much
Text excerpt from page 196 (click to view)
DV MECHANICAL ADJUSTMENT MANUAL VII
3-31.EJ Arm
1.
1) 2) 3)
Removal procedure
Remove the hook 1 of the tension coil spring (EJ arm) 3 that is hooked on the round hole A. Remove the EJ arm and the tension coil spring (EJ arm) 2 all together in the direction of the arrow. Remove the tension coil spring (EJ arm) 3 from the EJ arm 4.
2.
1) 2)
Attachment procedure
Install the tension coil spring (EJ arm) 3 into the round hole of the EJ arm 4 with the hook facing upward. Insert the top tip (bent) portion B of the EJ arm 4 into the groove of the mechanical chassis. Insert the dowel C into the round hole of the EJ arm. Insert he tension coil spring 1 into the round hole A of the mechanical chassis with the hook facing upward.
3)
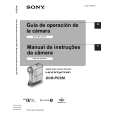
2 EJ arm, Extension spring (EJ) 1 Remove the hook. B
The spring hook faces upward 3 Extension spring (EJ)
The spring hook faces upward
A 4 EJ arm
Groove of the mechanical chassis Dowel C
EJ arm
Points to be noted
� When installing the EJ arm, confirm the front side and rear side so that the correct side is selected. � Extension spring (EJ) must not have elongation and opening of hook. Extension spring (EJ)