|
|
|
Who's Online
There currently are 6040 guests and
3 members online. |
|
Categories
|
|
Information
|
|
Featured Product
|
|
|
 |
|
|
There are currently no product reviews.
 ;
Excellent printing quality.
A complete and very usefull service manual with all details.
GREAT SERVICE AT VERY LOW PRICE!
A+++++++++++++++++++++++++
;
Excellent printing quality.
A complete and very usefull service manual with all details.
GREAT SERVICE AT VERY LOW PRICE!
A+++++++++++++++++++++++++
;
Pioneer CDXP23S is an old model and has been top useful for me to find this Manual. CD Player is still repaired.
;
Inventory (Stock): a rather extensive list of service manuals, which are hard to find, especially 15+ yrs old.
Pricing: very reasonable.
Delivery/Response: Very Prompt delivery of product: Placed order and received download access within 1.5hrs.
Service Manual: a rather complete OEM service manual (15.5MB pdf file size). Scan quality was very good, accept for a few circuit board diagrams that were dark; Zooming, however, clarified the image. Has the required information for servicing the LD Player.
;
Perfect copy of a necessary document and my Sonic Modulator is repaired!
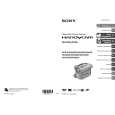
2-1-3. How to Set the Optical Sensor Disc 1) Fit a lug on the sensor side of optical sensor disc in the hole of the drive.
2-1-4. Precautions on Adjustment 1. Adjustment data The adjustment data for the drive block are recorded to the IC4403 on the MD-114 board. These data cannot be read or written from the adjustment remote commander or SeusCam, unlike the camera and LCD adjustment data. Accordingly, be sure to adjust all items of the drive adjustment when the following parts were replaced: � Drive block � Mounted MD-114 board 2. Order of adjustment Adjust the drive block in the following order: 1) POWER Adjustment 2) DVD-R Adjustment 3) DVD-RW Adjustment 4) DVD+RW Adjustment 3. Precaution on the laser diode
Fit a lug in the hole of drive.
Fig. 6-2-3
2) Push in the optical sensor disc until it clicks in the same manner as when setting a disc.
In the POWER Adjustment, operate the drive with the disc cover left open. During the adjustment, be sure to observe the following precautions: 1) Set the optical sensor disc correctly. 2) Keep the distance of more than 30 cm apart from the camcoder. 3) Work on the LCD screen side of the camcoder (opposite side of the drive). Note: Laser light of the equipment is focused by the object lens in the optical pick-up so that the light focuses on the reflection surface of the disc Therefore, be sure to keep your eyes more then 30 cm apart from the object lens when you check the emission of laser diode
Pickup Lens (Laser Diode)
Fig. 6-2-4
Fig. 6-2-5
DCR-DVD403/DVD403E/DVD803/DVD803E 6-46
|
|
|
> |
|