|
|
|
Who's Online
There currently are 5739 guests online. |
|
Categories
|
|
Information
|
|
Featured Product
|
|
|
 |
|
|
There are currently no product reviews.
 ;
Thank You for fast delivery for the sheme.
Everything allright.
Thanks & best regards Franz
 ;
again you did a very good job. It was fast too. Photocopy are really readable and clear
;
Probably it never existed a 1081 official service manual from Commodore, it's look more like a NAPCEC service manual & diagrams compilation of the 1084 series and his variants, like the nap6523, 8cm505, 1084S, 1084P and obviously the 1081. It's more complete than other scans and the quality of the scans also are far superior. It has two circuit diagrams variants of the 1081, mono and stereo versions. It doesn't include a diagram for the Philips CM8500 or CM8501, they look like the 1081 but they are slightly different.
;
Rapid, clear well done as all the scheme I downloaded from this site. Great job very functional and very useful
;
Great copy of the manual, has all information required for servicing,
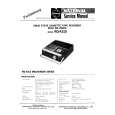
2-1. Electrical Alignment Overview 2-2. Preparations for Adjustment
2-1-3. Initial Settings
VDA-44 Board
S301
1 RV204 1 RV202 1 RV203 1 RV201
E2 TP1
S1
ON OFF
1
RV1
OFF ON
TP2 TP7
ON OFF
S3
RV2
1
1 RV401
Component side (A side)
Set the switches of the S301 before the adjustment as follows: (The marks indicate the switch lever position.)
ON 1 2 3 4 5 6
ON
S301 settings for 525 mode
1
2
3
4
5
6
S301 settings for 625 mode
n When switching the switch lever position from a customer-set position, use the table below to note down the setting state of the customer. After completing the adjustment, be sure to reset the switches to their customer-set position.
Ref.No. S301-1 S301-2 S301-3 S301-4 S301-5 S301-6 Setting during adjustment (Function) 525 mode 625 mode OFF (525 line) ON (Component) OFF (YUV) ON (7.5 % Setup) OFF (Rounding OFF) Don�t care ON (625 line) ON (Component) OFF (YUV) OFF (0 % Setup) OFF (Rounding OFF) Don�t care Customer-set position
2-2. Preparations for Adjustment
1. 2. 3. 4. Extend the VDA-44 board with the extension board EX-668. Connect the equipment and tools. (Refer to Section 2-1-2.) Set the switches on the VDA-44 board. (Refer to Section 2-1-3.) Turn on the power of the PFV-L1 and warm up the unit for about 10 minutes.
2-2(E)
BKPF-L613C
|
|
|
> |
|