The service manual was very usable and clear enough to see the individual values of all of the components (unlike some of the service manuals I have gotten in the past from web sites similar to this one). The price was right and the information was greatly appreciated. It helped me with an otherwise very difficult repair. It was much needed and appreciated. A faster turn around on my order would be nice, but I understand the constraints on your staff's time. Thank you for your service.
Great service!!! Polecam gorąco wszystkim zainteresowanym
Text excerpt from page 15 (click to view)
http://getMANUAL.com
1-5. Replacing the Printed Circuit Boards
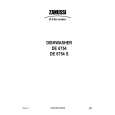
1-5-2. CCM-36/36A Board
Replacement parts CCM-36 board : Please order the BDKP-N1001. CCM-36A board : Please order the BDKP-N1002. Replacement Procedure 1. Turn off the main power and remove the AC plug from the outlet. 2. Remove the top panel. (Refer to Section 1-2-1.) 3. Remove the four screws (PSW 3x6) fixing the CCM36/36A board. 4. Remove the CCM-36/36A board from the IF-694 board.
PSW 3x6 PSW 3x6
1-5-3. CCM-40/40A Board
Replacement parts CCM-40 board : Please order the BDKP-N1003. CCM-40A board : Please order the BDKP-N1004. Replacement Procedure 1. Turn off the main power and remove the AC plug from the outlet. 2. Remove the top panel (Refer to Section 1-2-1.) 3. Remove the four screws (B 3x6) and remove the rear panel.
B 3x6
Rear panel
B 3x6
CCM-36/36A board
4. Remove the four screws (PSW 3x6) fixing the CCM40/40A board. 5. Remove the CCM-40/40A from the IF-694 board.
PSW 3x6 PSW 3x6
IF-694 board
5. Attach the new CCM-36/36A. (Refer to the Installation Manual.) 6. Perform the frequency check and picture check. (Refer to the Installation Manual.) 7. Attach the top panel.
CCM-40/40A board
IF-694 board
6. Attach the new CCM-40/40A board and rear panel. (Refer to the Installation Manual.) 7. Perform the frequency check and picture check. (Refer to the Installation Manual.) 8. Attach the top panel.