|
|
|
Who's Online
There currently are 5749 guests and
1 member online. |
|
Categories
|
|
Information
|
|
Featured Product
|
|
|
 |
|
|
There are currently no product reviews.
 ;
Excellent quality, helped to fix problem. Thank you very much!!!!
;
I thank Owner-Manuals.com for providing the necessary manual very quickly, and it was very helpful in repairing my personal Audio System and I once again thank them for the wonderful customer's service satisfaction.
Thanks.
;
Everything fine: quick service, no glitch and above all a very good quality of the Pdf file. Thank you!
;
The manual was complete, parts list, adjustment procedures, etc. No worries
 ;
Very usefully, I could find the trouble clearly with that manual.
1-3. Removal of Cabinet
1-3. Removal of Cabinet
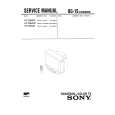
1-3-1. Removal of Front Panel
1. Turn the power off. 2. Unplug the appliance from the outlet. 3. Loosen the locking screw on the front panel using a flat-blade screwdriver. 4. Pull the locking screw toward you and open the front panel.
1-3-2. Removal of Upper Chassis
1. 2. 3. 4. Turn the power off. Unplug the appliance from the outlet. Remove the front panel. (Refer to the Section 1-3-1.) Remove the two screws and the harness clamper shown in the figure.
Front panel B 3x6 Harness clamper Locking screw
5. Disconnect the connector CN701 on the DEC-99 board. 6. Push the hinge shaft in the direction of the arrows while holding the front panel, and remove the front panel.
5. Remove the four screws, and remove the rack angles of both sides. 6. Remove the 15 screws shown in the figure, and pull up the upper chassis.
Upper chassis B 3x6 B 3x6 B 3x6 B 4x10
Front panel CN701
B 3x6 B 3x6 Rack angle
B 4x10
B 3x6
Rack angle
Hinge shaft
DEC-99 board
1-2 (E)
BDX-D1000
|
|
|
> |
|